Creating New Materials in AutoCAD
- Lesson 3-1INTRODUCTION TO 3-D (Terminology)
- Lesson 3-2ISOMETRIC DRAWING IN AUTOCAD
- Lesson 3-3WORKING IN 3 DIMENSIONS (X,Y,Z Axes, 3D Rotation)
- Lesson 3-4VIEWING 3-D OBJECTS (Perspective Views, 3D Orbit, DView)
- Lesson 3-5BASIC WIREFRAME MODELS
- Lesson 3-6LINE THICKNESS
- Lesson 3-7REGIONS AND 3-D FACES AND EXTRUDING
- Lesson 3-7aMORE ABOUT EXTRUDING & LOFTING
- Lesson 3-8REVOLVED OBJECTS - REVSURF AND REVOLVE
- Lesson 3-9ADDING MATERIALS IN AUTOCAD
- Lesson 3-10PRIMITIVE SOLIDS
- Lesson 3-11BOOLEAN OPERATIONS AND 3D EDITING
- Lesson 3-12CHANGING FROM THE WCS TO THE UCS
- Lesson 3-13MAPPING MATERIALS
- Lesson 3-14CREATING NEW MATERIALS
- Lesson 3-15EXTRA PROJECTS AND A TUTORIAL
- Lesson 3-16PUTTING IT ALL TOGETHER - MODEL A BUILDING
- Lesson 3-17INTRODUCTION TO RENDERING AND LIGHTING IN AUTOCAD
- Lesson 3-18CREATING ANIMATIONS IN AUTOCAD
- QUIZ FOR LEVEL 3 - 84 QUESTIONS
Topics covered in this Lesson:
Creating your own custom materials
Once you start working with AutoCAD's default materials, you'll soon realize that you don't really have a large selection. What if you need a white stucco material for a wall? Or grass for the lawn, or brushed aluminum, or... well, you get the picture. What you need to do is create your own materials.
The first step is to locate an image that represents the material you want in your drawing. There are a number of sources available on the internet. Below are 3 samples you can try for this lesson. Click on the images to download the samples.
Pick on any of the images above and when the new window opens, right click on the large image and select "Save image as..." and save it in a folder where you can find it easily.
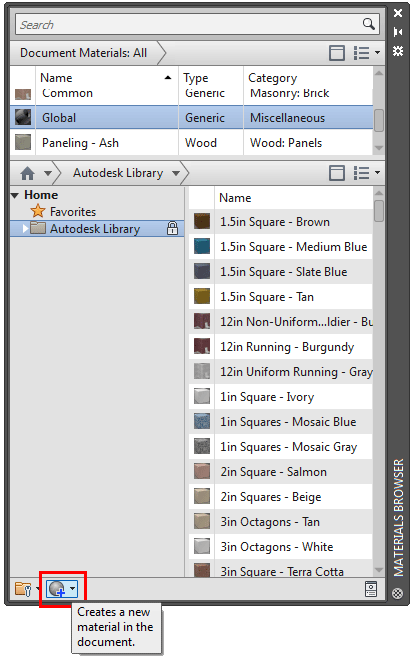
Now start the MATERIALS command to open the Materials Palette.

Look for the button shown in the red box above - this will let you create your own custom materials.
I will take you through the simple process of creating a material from an image file and applying it to an an object in your drawing. Then you will learn how to modify the material.
The previous lesson will give you more information on mapping the material to an object.
To create a new material from one of the images from above (or another texture) open the materials palette and click New Material button. This will give you a droplist to select the type of material you are creating. Select New Generic Material and we'll use the metal image you downloaded at the top of the tutorial.

Next you'll see the palette for creating new materials. Click on the Information tab and fill in the three fields as shown below.

Click on the Appearance tab and add your image by selecting in the box shown below. The will open up window so that you can navigate to the image's location. Load the image and you'll see it shown in the window.

For now we'll just use the default settings so that you can see how the material looks "straight out of the box". Apply your new material to an object and see how it looks. Perform a render if you want a better view.

Your object might look a little different from what I show above, but it should be close. Now that you've seen your material in action, you can adjust some setting and see how it changes the appearance. If you move the slider for transparency for example, you'll see the changes live on your screen.

Try some of the different settings to see what they do. You have endless possibilities to make your materials do exactly what you want it to do.
Although the example above is very basic, it shows how you can quickly create some materials for a custom rendering. Keep this in mind when you are just starting your rendering process or when you don't have any advanced materials to work with.
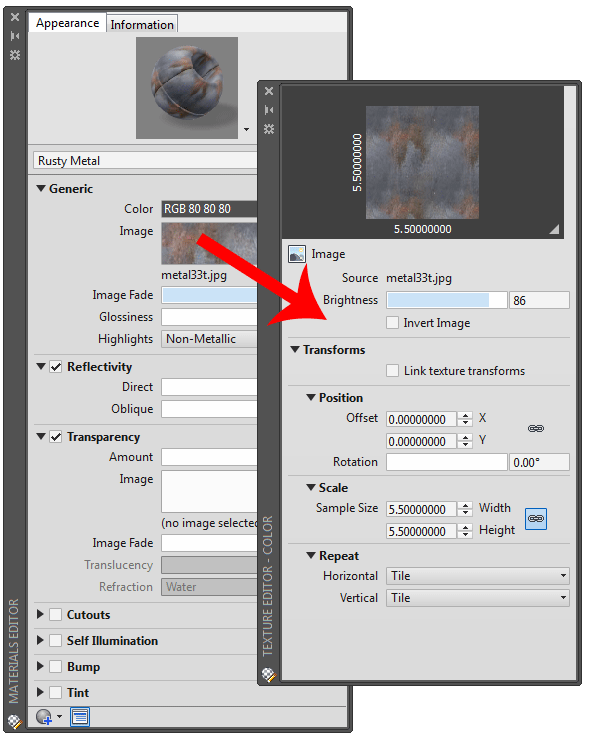
You can edit the image you're using if you click on the small sample image in the palette.
Create another new material like you did above. Instead of editing the material, this time you will use on of the images you saved (from above) to create a more realistic material.

A couple of things to look at here are the Brightness and Scale settings. Adjust the brightness and you can darken your material easily. The one I use quite often is Scale. This allows me to quickly change how big the material appears on the objects. This can be done using MAPMATERIALS, but it's also easy to do in this palette. The scale you use will depend upon two things: the size of you image (in pixels) and the size of your object. You'll have to play with this one to get it looking the way you want it. As a rule, larger image files are better as you can scale them down and retain clarity
This is just an introduction to the world of creating new materials. If you have a photo editing program like Photoshop or PixBuilder Studio (it's free), you will be able to adjust the image files to fit your needs.
For practice, here is good way to get graphics into your renderings. Draw an octagon (POLYGON command) and turn it into a REGION. Then create a new material using this image of a stop sign and apply it to the region. You will most likely have to adjust map settings to make it look good (or use the scale to object option shown above). For even more fun, add a wooden pole to it and use 3DROTATE to make it stand up properly.
For more practice, try downloading some images or using ones that you already have and apply them to objects. Use the mapping tools to adjust them.
Video: Custom Materials n AutoCAD 2021
You Scored:

Fun fact: Designed with help from AutoCAD, the 128-story Shanghai Tower only had 7 change orders from design to construction.
Please support
MyCADsite.com
Give a donation!
Donate

- To cover this months server costs
- Exceeding amounts will go to creating new content
- Even a penny will help
Did you like the lesson? ❤️


