Types of Dimensions in AutoCAD
- Lesson 4-1AUTOCAD TEMPLATE FILES
- Lesson 4-2USING OSNAPS IN AUTOCAD
- Lesson 4-3LINETYPES AND LINETYPE SCALE
- Lesson 4-4AUTOCAD FILE FORMATS
- Lesson 4-5GRIP EDITING / DIVIDE COMMAND
- Lesson 4-6AUTOCAD'S INQUIRY TOOLS
- Lesson 4-7XREF'S (EXTERNAL REFERENCES)
- Lesson 4-8SYSTEM VARIABLES IN AUTOCAD
- Lesson 4-9TABLES
- Lesson 4-10CREATING AND PUBLISHING SET SHEETS
- Lesson 4-11MODIFYING AND CREATING DIMENSIONS
- Lesson 4-11aDIFFERENT TYPES OF DIMENSIONS
- Lesson 4-12INTRODUCTION TO CUSTOMIZING AUTOCAD
- QUIZ FOR LEVEL 4 - 67 QUESTIONS
Topics covered in this Lesson:
Dimension Types in AutoCAD
Concept:
This tutorial will explain the different types of
dimensions which are commonly used in AutoCAD and help you understand their differences. A good
AutoCAD drawing will convey the needed information clearly and accurately. Dimensioning is used
to let the drawing reader know what size each length or curve is, without having to open the
drawing and measure it. If your dimensions are inaccurate, you will not be working in CAD for
very long, no matter how accurate your drawing is. Learn when each dimension is needed and how
to use it.
If you need to modify the appearance of your dimension, please refer to the previous tutorial - 4-11.
| Dim Type | Keystroke | Icon | Description |
|---|---|---|---|
| Linear | DIMLINEAR / DIMLIN | Dimensions for straight lines either horizontal or vertical to the UCS. | |
| Aligned | DIMALIGNED / DIMALI | Dimensions for straight lines that are angled to the UCS and provides the line's length. | |
| Angular | DIMANGLUAR / DIMANG | Dimensions between 2 points and gives the resulting angle measurement. | |
| Arc Length | DIMARC | Dimensions the length of an arc or arc segment of a polyline. | |
| Radius | DIMRADIUS / DIMRAD | Dimensions the radius of an arc, circle or arc segment of a polyline. | |
| Diameter | DIMDIAMETER / DIMDIA | Dimensions the diameter of an arc, circle or arc segment of a polyline. | |
| Center Mark | DIMCENTER | Places a center mark at the center point of an arc or circle | |
| Rotated | DIMROTATED | - | A modifier to a dimension to make it parallel to a selected line. |
| Spacing | DIMSPACE | Aligns the selected dimensions to an even spacing. | |
| Continue | DIMCONTINUE / DIMCONT | Continues dimensioning from a base dimension | |
| Baseline | DIMBASELINE / DIMBASE | Continues dimension from a base dimension to give an overall dim. |
Types of Dimensions in AutoCAD
You have most likely already used some of the common dimension types like 'linear' or 'radius'. This section will describe how each one works in more detail.
Linear Dimensions:
Linear dimensions are used to create
a dimension that measures a line that is either horizontal or perpendicular to the UCS. This is
the most commonly used dimension and is very easy to use. Below are some typical linear
dimensions:

It's good practice (thought not always allowed by time) to have your dimensions at a consistent distance from the object. Make sure that it is not to close to overlap the object and not too far to confuse which object you dimensioned. To create a linear dimension, either use the icon or key in DIMLINEAR. Just pick the two endpoints of a line (or any two points) and then place the dimension line where you want it. Very quick, very simple.
Command: DIMLINEAR
Specify first extension line origin or <select object>:SELECT FIRST POINT
Specify second extension line origin:SELECT SECOND POINT
Specify dimension line location or
[Mtext/Text/Angle/Horizontal/Vertical/Rotated]: SELECT LOCATION OF DIM LINE
Dimension text = 5.00
Note that there are some options at the command line:
| OPTION | DESCRIPTION |
|---|---|
| MText / Text | You don't need to use these, it doesn't really affect your dimensions |
| Angle | This will place your text at the angle you specify |
| Horizontal | This will create a horizontal dim, but you select this when you place your dimension line. Rarely needed. |
| Vertical | This will create a vertical dim, but you select this when you place your dimension line. Rarely needed. |
| Rotated | This will create a 'rotated' dimension. This is explained below. |
You'll also notice on the first prompt, you can <select object>, but press <enter> at this point and then you can just select the line instead of the two endpoints. This is a lot quicker and more accurate as you don't have to worry about picking the wrong Endpoint Osnap.
Since this is a common command, it is worth creating an alias for it (see next lesson).
Aligned Dimensions:
The Aligned dimension works
just like the linear dimension. The big difference is that it works with lines or distances that
are not square to the UCS. You can also use this on any 2 points that are also compatible with
the linear dimension. It will create a dimension parallel to the angled line.
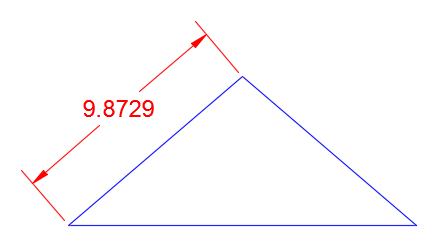
Command: DIMALIGNED
Specify first extension line origin or <select object>:SELECT FIRST POINT
Specify second extension line origin:SELECT SECOND POINT
Specify dimension line location or
[Mtext/Text/Angle]: SELECT LOCATION OF DIM LINE
Dimension text = 2.00
You'll see that command line prompts are almost the same. Of course, there are no options for horizontal or vertical placement. Also Rotate is missing to avoid confusion and errors. You can also select Angle for your text to match the angle of line (just select 2 points on the line you are dimensioning). You can also set your text to be aligned with the dimension line in your Dimension Style Manager.
Angular Dimensions:
Not every
dimension gives the reader a length. Sometimes other measurements are need. Angular
dimensions will display the angle between two objects. The measurement of the angle is
defined by your dimstyle, but degrees is standard. The command works similar to the linear
dimensions (see a pattern?).

Command: _dimangular
Select arc, circle, line, or <specify vertex>: <select first line>
Select second line: <select second line>
Specify dimension arc
The example above shows 3 common uses of this tool. To get the angle on the arc, just select anywhere on it. Getting the outside measurement (225° in this example) is done by using the prompt <select vertex>.
Command: DIMANGULAR
Select arc, circle, line, or <specify vertex>:Specify angle vertex: <select point A>
Specify first angle endpoint: <select point B>
Specify second angle endpoint: <select point C>
Specify dimension arc line location or [Mtext/Text/Angle/Quadrant]:<place dim>
Dimension text = 225

Arc Length:
This is a fairly new
command in AutoCAD and will not be available on some older versions. This command works
simply, just start the command and select an arc or arc segment of a polyline. In the
example below, I have shown the Angular (180°) dimension with the Arc length so that you can
see the difference. Notice the symbol in front of the 3.14.
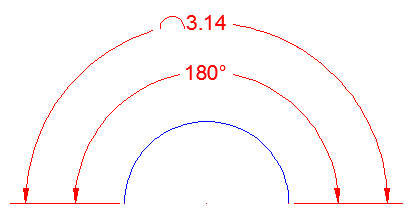
Command: _dimarc
Select arc or polyline arc segment: <select the arc>
Specify arc length dimension location, or [Mtext/Text/Angle/Partial/Leader]: 1.2
Dimension text = 3.14
Once again, you are offered some options when dimensioning. Mtext/Text/Angle are the same options for text that you saw earlier. Partial will allow you to dimension only part of the arc. This is useful for midpoints or nodes, when the arc is segmented. Leader will draw a leader from the dim text to the arc that it refers to.

Radius Dimension:
Another common and
simple command. DIMRAD will dimension any arc or circle and give you
the radius and place a center mark at the center of the selected object. A center mark is a
cross the indicates the center point of an arc or circle.
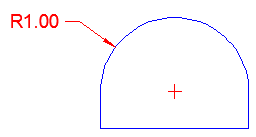
Command: _dimradius
Select arc or circle: <select object>
Dimension text = 0.40
Specify dimension line location or [Mtext/Text/Angle]: <place the dim>
Once again, you have some options for the text at the command prompt.
Diameter Dimension:
The diameter and
radius dimensions work the same, but give a different measurement. As a rule, I will use the
diameter dim on things like a hole to be drilled or for the dimensions of an overall part and
radius for filleted corners, etc.

As you see, the diameter and radius dimensions add a center mark (this can be turned off, or changed to a larger line (in DDIM). I will usually dimension the circles first so that I can select the center mark and have a small gap (it looks cleaner).
Command: _dimdiameter
Select arc or circle: <select the object>
Dimension text = 1.00
Specify dimension line location or [Mtext/Text/Angle]: <place the dim>
In the example image above, you can see that even a very simple drawing can have enough dimensions to clutter things up. Make sure that you have enough dimensions and don't duplicate or miss any. Make sure that they can be read from one or two angles when printed (usually from the bottom right corner).
Center Mark:
By now you should be
getting the hang of how this works. The DIMCENTER command adds a
center mark to a circle or arc. How it is displayed is set in the DDIM dialog box
under the "Symbols and Arrows" tab. If you
select "None" you will not be able to place a center mark using this command. The icon
for center marks is in the sub menu on the dimension panel.
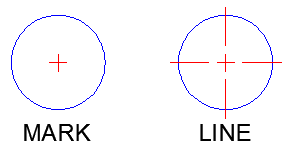
Sometimes you might use both in the drawing. Below. on the left, I used the center mark that was made with the diameter dimension, then I dimensioned from it. On the right, I used a Line center mark and extended one of the lines to the other side to indicate the the holes are aligned. Then I double-clicked on the diameter text and added a suffix to indicate that both holes are the same size.

But when you do this, any of the center marks made by the diameter or radius dimensions will change to the new style that you selected. It's best to start with one style and leave it. The size of your center mark is defined by the DIMCEN system variable.
Rotated Dimensions:
A rotated dimension
is not a dimension that was rotated using the rotate command. Instead it allows you to create a
linear dimension to two points that are not in a straight line. Look at the image below and see
the difference between an aligned dimension and a rotated one.
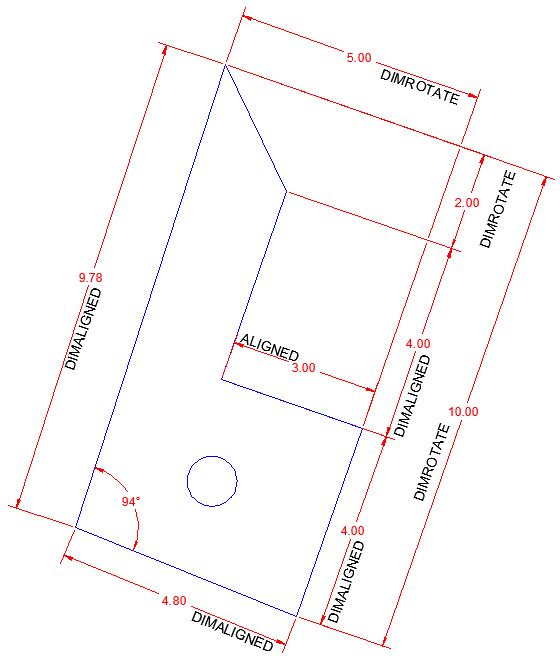
First, look the dimension on the far right. See how it gives a true overall size of 10 units? On the right, the aligned dimension is not the overall size due to the 94° angle in the bottom left corner. Also in the top right, notice the rotated dimension with 2.00 units. I need to rotate it as the 2 points that I selected were not on the same axis. It's a little confusing at first, but try it a few times.
Command: dimlin
DIMLINEAR
Specify first extension line origin or <select object>: <first endpoint>
Specify second extension line origin: <first endpoint>
Specify dimension line location or
[Mtext/Text/Angle/Horizontal/Vertical/Rotated]: R <enter>Specify angle of dimension line <0>: <select first point on axis>
Specify second point: <select second point on axis>
Specify dimension line location or
[Mtext/Text/Angle/Horizontal/Vertical/Rotated]: <place dim>
Dimension text = 2.00
When it comes to selecting points on the axis, pick the common parallel line (in this example, I click 2 points on the 10 unit dimension. You can also created a rotated dim by using the DIMROTATED command. In this case, you select the angle first.
Even Spacing of Dimensions:
Sometimes you might have a
bunch of dimensions in one area and want to space them evenly. The easy way to do this is to
place them quickly, then use the Adjust Space command, DIMSPACE.
Look at the image below with the random spacing. Then mouse over it to see how this commands
gives them even spacing.
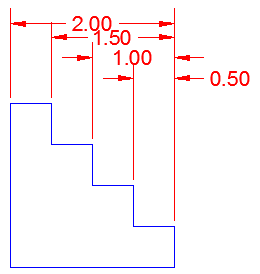
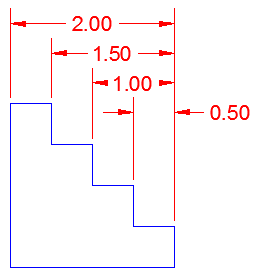
Draw a similar shape and try this. Place your dims, but allow for enough room to fit them all (just don't worry about the spacing). Then start the DIMSPACE command.
Command: DIMSPACE
Select base dimension: <I selected the 2.00 dim in this example>
Select dimensions to space:
Specify opposite corner: 3 found <select the others>
Select dimensions to space: <enter>
Enter value or [Auto] <Auto>: <enter>
Fast and easy. You have the option at the end to enter a distance between each dim, but Auto should work in most cases. Just be careful to select the "Base" dimension you want first - try selecting other dimensions as your 'base' to see what results you get.
Continue Dimensions:
Another shortcut
is to use is "Continued Dimensions". This is used when you have a series of linear
dimensions that will all be on one side of an object. With this command, you can select a 'base'
dimension and then have AutoCAD help by continuing the command so that you can just click and
endpoint and continue to the next, click an endpoint, etc. Have a look at the drawing below:
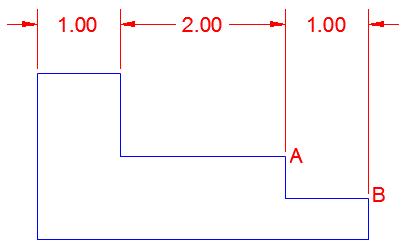

When you have a series of dimensions all in one plane like this, just create the first one with DIMLIN and then use the DIMCONT command to create the rest of them. In this example, I created the dim on the left first.
Command: _dimcontinue
Specify second extension line origin or [Select/Undo] <Select>: <SELECT A>
Dimension text = 2.0000
Specify second extension line origin or [Select/Undo] <Select>: <SELECT A>
Dimension text = 1.0000
Specify second extension line origin or [Select/Undo] <Select>: <ENTER>
After doing this, the next time you start the DIMCONT command, it will return to this point and continue on. Try this out in your own drawing with a simple shape like the one above.
Baseline Dimensions
This command is
very similar in function to the continue command, but instead provides an overall dimension
based upon the first point you select in your first (base) linear dimension.
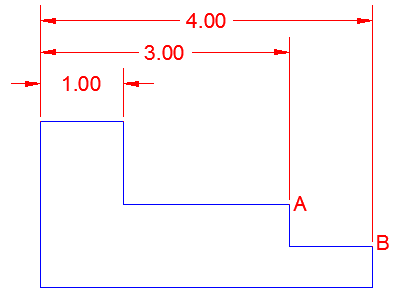

Command: _dimbaseline
Specify second extension line origin or [Select/Undo] <Select>: <SELECT A>
Dimension text = 3.0000
Specify second extension line origin or [Select/Undo] <Select>: <SELECT B>
Dimension text = 4.0000
Specify second extension line origin or [Select/Undo] <Select>: <ENTER>
Once again, I first needed to create a base dimension with the DIMLIN command. I again used the dim on the left (first point was on the left). Then I started the DIMBASE command and selected points A and B. Once again, try it out and see how this works. See what happens when you create your base dim from right to left.
Summary:
You have a lot of tools at your disposal when it
comes to dimensions. The trick is to know when to use each one. It's also extremely important
that you are accurate. Clicking on another dimension instead of a line's endpoint can be a huge
mistake - especially in mechanical drafting where tolerances are small. Review your dimensions
before sending a drawing off to someone else, or printing it- then check it again. Check for
overlaps or other confusing areas. The commands themselves are easy to use, but accuracy is
critical.
Video: Types of Dimensions in AutoCAD
You Scored:

Fun fact: AutoCAD is the Autodesk's largest revenue-generating product.
Please support
MyCADsite.com
Give a donation!
Donate

- To cover this months server costs
- Exceeding amounts will go to creating new content
- Even a penny will help
Did you like the lesson? ❤️
