Sheet Sets in AutoCAD
- Lesson 4-1AUTOCAD TEMPLATE FILES
- Lesson 4-2USING OSNAPS IN AUTOCAD
- Lesson 4-3LINETYPES AND LINETYPE SCALE
- Lesson 4-4AUTOCAD FILE FORMATS
- Lesson 4-5GRIP EDITING / DIVIDE COMMAND
- Lesson 4-6AUTOCAD'S INQUIRY TOOLS
- Lesson 4-7XREF'S (EXTERNAL REFERENCES)
- Lesson 4-8SYSTEM VARIABLES IN AUTOCAD
- Lesson 4-9TABLES
- Lesson 4-10CREATING AND PUBLISHING SET SHEETS
- Lesson 4-11MODIFYING AND CREATING DIMENSIONS
- Lesson 4-11aDIFFERENT TYPES OF DIMENSIONS
- Lesson 4-12INTRODUCTION TO CUSTOMIZING AUTOCAD
- QUIZ FOR LEVEL 4 - 67 QUESTIONS
Topics covered in this Lesson:
Creating Sheet Sets in AutoCAD | Publishing a Sheet Set
Concept:
Sheet sets are the digital version of the rolled
up groups of drawings shoved in the back corner behind you. Actually they are the next
progression from old Pack 'n' Go (now ETRANSMIT). This time though,
you are just sending the layouts and not your actual CAD file. There are a lot of variables
involved when you create these, but this tutorial will give you an idea of what's involved.
Sheet sets can be published as DWF's or opened up within AutoCAD (.dst extension).
| COMMAND | KEYBOARD | ICON | LOCATION | DESCRIPTION |
|---|---|---|---|---|
| Sheetset | SHEETSET | View > Palettes > Sheet Set Manager |
Opens the Sheet set Manager |
Procedure:
The first thing you would do is check that you
have all your 'ducks in a row' concerning the drawings and layouts that you plan to publish. It
sounds obvious, but you don't want to keep creating Sheet Sets after you find the layouts are
scaled wrong, duplicated or whatever.
In this tutorial, I'll be using some of the example drawings that come with a
standard AutoCAD installation. This is easier than creating a complex set of drawings and
layouts just for this exercise. To follow along, make sure you have this folder available (or
use a similar location for your version of AutoCAD):
C:\Program Files\Autodesk\AutoCAD 2021\Sample\Sheet Sets\Architectural
Start the command, SHEETSET, or use the View > Sheet Set Manager ribbon option to invoke the command (for those that like icons, it looks like the rolled up sheets shoved in the corner behind you. The Sheet Set Manager palette will open as shown below - select the New Sheetset option from the top drop menu.

After that , you'll see what could possible be the largest dialog box you've ever seen with so little info:

Press "Next" and get taken to Step 2.

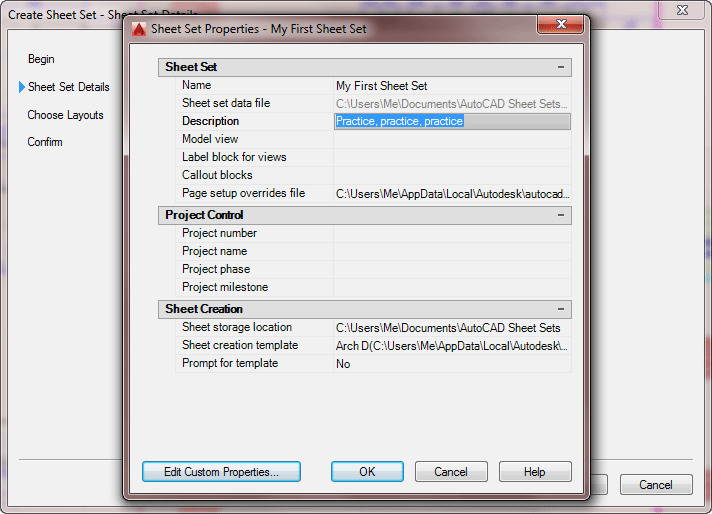
This seems fairly simple, give your set a (1) name, a (2) description and tell AutoCAD (3) where to save the file. There is a button for "Sheet Set Properties" that gives you some more options on the set (below) - you can even create your own custom fields here (or make changes to what you just entered).

For the sake of simplicity, this lesson will not cover the 'Sheet Set Properties', but it is straightforward to create your own fields.
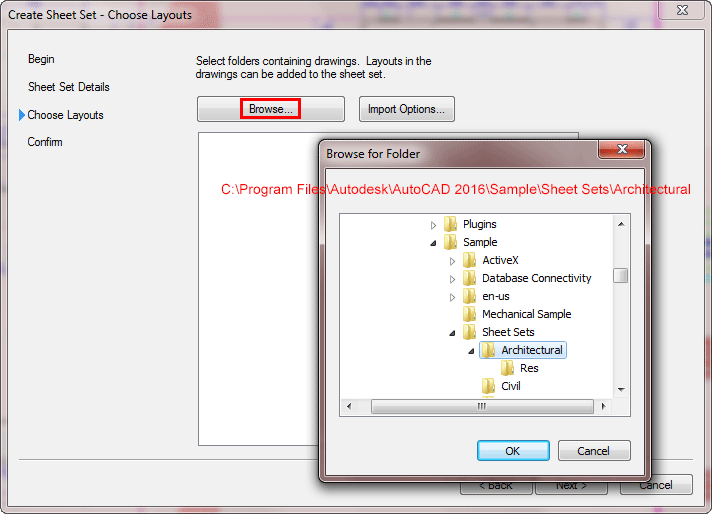
The next tab is where you can select the "folders" where your drawings are located and add them to the Set. In your AutoCAD installation folder, select the sample folder shown below.

You now can turn on or off the layouts as you need to them. In this example I have excluded the section layouts.

The last step is to confirm what you just did in the final tab of the wizard.

You see a list of layouts that will be part of this Sheet Set - if it's what you
want, press "Finish".
After finishing the wizard, you are back in AutoCAD and
ready to work with the Sheet Set. Any changes you make now are automatically saved to the .DST
file in the location you selected at the beginning.
If you double-click on a sheet name, it opens up the drawing file in the selected layout tab.
Below, I have done a 'click and drag' to bring the "Title Sheet" layout to the top. As I mouse over the name of that layout, I get a preview image as well as some information about this layout.

The Sheet View list (second tab down) allows you to zoom directly to any saved view that was part of the layout (a new, great use for views).

As with anything in AutoCAD, there is more to these, but this lesson is aimed at explaining the concepts behind the command.
Publishing a Sheet Set
Now you that you have created a great Sheet Set you need to publish it. This can be to PDF files, to a printer or as DWFx files - you have options.
Make sure you are back at the "Sheet List" tab in the Sheet Set Manage palette.

In this example, we'll plot the Sheet Set to DWFx. Click on the Publish button (above in red) and select "Publish to DWFx". Select a location to save your DWF and choose "Select". You will likely get a message telling you that AutoCAD will publish the DWFx in the background so that you can continue working.
Once the publishing is complete, you can view the DWF in a viewer like this one online or any DWF viewers you have on your computer.
Conclusion: Sheet Sets are a great way to share your drawings. As your drawings get more complex, you may have more than one file connected with a project and to share all of the information easily, you can create a Sheet Set that you client requires. Once you have this, you can arrange and edit the layouts that you want to share and publish them in a format that is easy to view for someone without AutoCAD.
Video: Creating Sheet Sets in AutoCAD
You Scored:

Fun fact: One of Autodesk's flagship products is AutoCAD software application for 2D and 3D computer-aided design and drafting.
Please support
MyCADsite.com
Give a donation!
Donate

- To cover this months server costs
- Exceeding amounts will go to creating new content
- Even a penny will help
Did you like the lesson? ❤️
